One day I was doing maintenance on my Prusa CORE One and broke the USB port on the LCD. Without a USB stick the CORE One doesn’t work. Prusa support confirmed it. A replacement LCD is pretty costly to get to Canada, so while I waited for it I looked at how to set up OctoPrint for the CORE One.
I ran OctoPrint with my Prusa MK3S+ for about 8 years and it was good. The idea that one broken USB port can stop the whole printer pushed me to get OctoPrint up and running again.
There was one more reason. My son uses the printer too. To see the printer in PrusaSlicer through Prusa Connect, he would need to log in with my Prusa account. I didn’t like that, so he used PrusaLink on the local network to upload models. With OctoPrint on the MK3S+ we could share one user or have a user each. He didn’t depend on me.
I was surprised there’s no central, standard guide for OctoPrint on the CORE One. The information is scattered across Reddit, the Prusa forum and GitHub. The one compiled set of steps I found was the OctoPi + CORE One guide by gilrstein1-ui, put together with AI. It was a good start. I skipped its AI failure detection features and used a Telegram bot instead. I might add AI detection later.
This post is the full setup as I did it, from buying parts to the first test print. Here’s the short version.
| Area | What I ended up with |
|---|---|
| Hardware | Raspberry Pi 4 Model B (4 GB), 64 GB microSD, USB to the printer |
| Power | 24V to 5V buck converter behind the printer’s PSU cover |
| OS | OctoPi 1.1.0, 64-bit (arm64), Debian 12 bookworm |
| OctoPrint | 1.11.8 |
| Camera | Prusa Buddy3D Wi-Fi camera, RTSP into go2rtc, MJPEG out through haproxy |
| Printer link | Lower USB-C port, /dev/ttyACM0 at 230400 baud, auto-connect |
| Alerts | OctoPrint Telegram plugin |
| Pause / resume / cancel | M601 / M602 / M604 plus M141 S0 |
| SD card protection | zram swap, /var/log on tmpfs, persistent journal, commit=60 |
What I bought.
| Item | What it’s for | Where |
|---|---|---|
| Raspberry Pi 4 Model B, 4 GB | Runs OctoPi | PiShop.ca |
| Armor case with dual fan, black | Cooling and protection for the Pi | PiShop.ca |
| UGREEN right-angle USB-A to USB-C cable, 1.5 ft | Pi to the printer’s lower USB-C port | Amazon.ca |
| SanDisk 64 GB Ultra microSD | OctoPi system card | Amazon.ca |
| 12V/24V to 5V USB-C buck converter, 3A | Powers the Pi from the printer’s PSU, no separate adapter | Amazon.ca |
| Verbatim 32 GB Store ‘n’ Stay Nano USB stick | Replaces the original USB stick. It’s small and hidden, so you don’t hit it by accident like I did | Amazon.ca |
| 6x3 mm neodymium magnets (9 needed) | Hold the Pi case on the printer | AliExpress |
What I printed.
| Part | Notes | Model |
|---|---|---|
| Pi 4 case base with magnets for the Armor case | My remix. Holes for the Armor case bolts, 9 magnets. PETG or PC, supports for the bolt holes only | Printables |
| CORE One PSU cover mount for a power transformer | Holds the buck converter behind the PSU cover. PETG, needs supports, 2x M3 heat-set inserts and 2x M3x8 screws | Printables |
⚠️ Wiring anything into the printer’s power supply is at your own risk. Unplug the printer before you open the PSU cover.
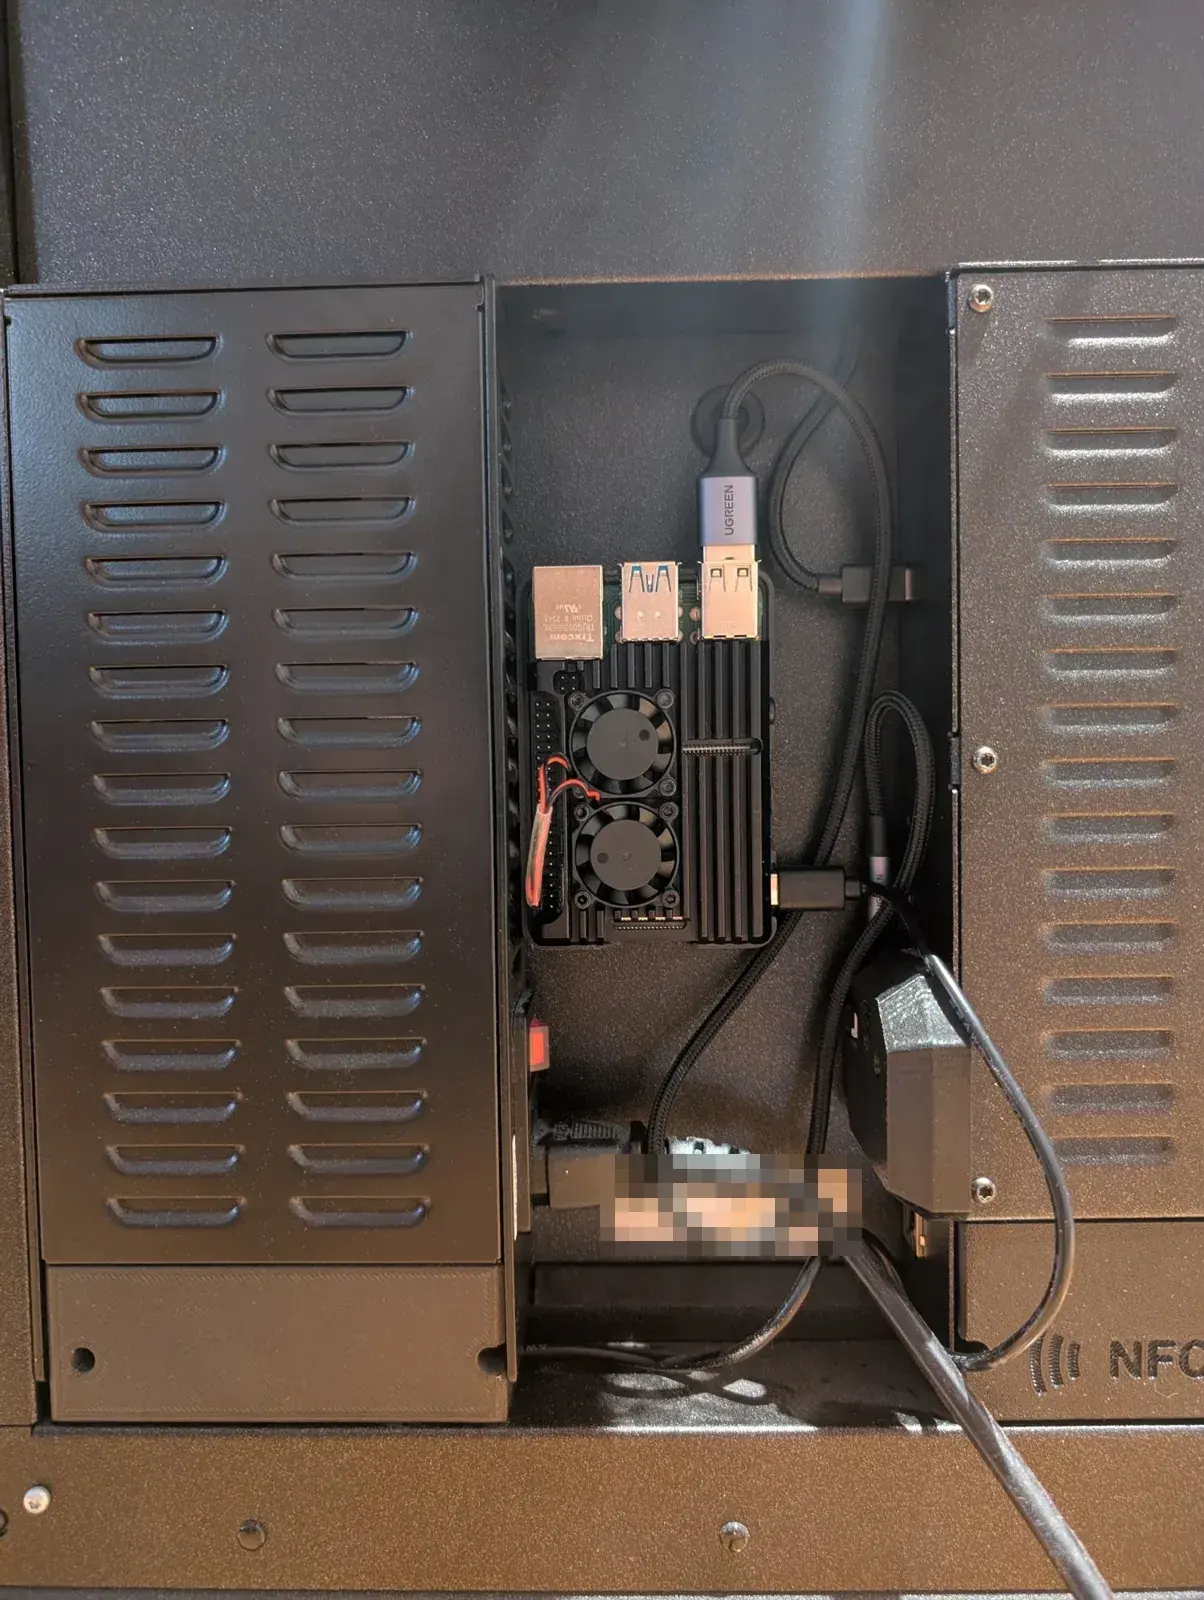
Here’s how it all sits on the back of the printer. The Pi in its Armor case holds on with the magnetic base between the two panels. The buck converter in its printed mount is on the right, next to the PSU cover. The UGREEN cable goes from the Pi’s USB port to the lower USB-C port on the printer. That’s the port on the xBuddy board that talks to OctoPrint. The upper USB-C port is used by the Buddy3D camera.
These are the problems I hit while setting everything up. Not the broken USB port, that’s a different story.
| Problem | Fix |
|---|---|
| Imager wrote a 32-bit OctoPi | Add the unofficialpi.org repository to Imager and pick the 64-bit build |
| Customisation greyed out in Imager | Same fix, a custom .zip has no metadata |
systemctl mask failed without an error | Rename the unit files, then mask |
| haproxy returned 503 for the camera | Point the webcam1 backend at go2rtc on port 1984 |
| A power cut ended a print and lost that morning’s logs | OctoPrint can’t resume. Shorter commit interval, keep the printer and Pi on a UPS |
Table of contents
Open Table of contents
- 1. Static IPs for the Pi, printer and camera
- 2. Flash 64-bit OctoPi
- 3. First boot check
- 4. OctoPrint setup wizard and printer profile
- 5. OS hardening for the SD card
- 6. Turn off the default camera services
- 7. Camera pipeline with go2rtc
- 8. Connect the printer
- 9. Plugins and Telegram
- 10. G-code scripts for pause, resume and cancel
- 11. PrusaSlicer
- 12. Test print
- 13. Updates and validation
- 14. The power cut
- 15. What I’d tell you before you start
- Links
1. Static IPs for the Pi, printer and camera
Give each device a fixed IP in your router before anything else. Scripts, bookmarks and the camera config all depend on them.
| Device | IP |
|---|---|
| Raspberry Pi (OctoPrint) | 192.168.50.76 |
| Prusa CORE One | 192.168.50.73 |
| Buddy3D camera | 192.168.50.197 |
I have an Asus router. In its admin page I went to LAN > DHCP Server, turned on manual assignment and added a rule for each device with its MAC address and the IP I wanted. Each device shows up in the router’s client list after it first connects, so that’s where you find its MAC address.
Reserve the IPs in the router, not on the devices. A router reservation is tied to the MAC address, so it survives a reflash.
My Pi user is pi. All commands below use /home/pi and my IPs. Replace them with yours.
2. Flash 64-bit OctoPi
My first try was the default OctoPi entry in Raspberry Pi Imager. It boots fine. But when I checked, it was 32-bit. To check yours, SSH into the Pi and run these two commands.
cat /etc/os-release | grep PRETTY_NAMEuname -mOn the default image I got this.
PRETTY_NAME="Raspbian GNU/Linux 12 (bookworm)"armv7larmv7l and the “Raspbian” name mean a 32-bit system. This command confirms it.
dpkg --print-architecture# armhf -> 32-bit# arm64 -> 64-bitDoes 64-bit matter? Not much for OctoPrint itself. Sending G-code over serial is light work. The gain is in ffmpeg, which transcodes the camera stream all day. I was at the very beginning with nothing configured yet, so reflashing cost me nothing. Later it would mean a full rebuild. So I reflashed.
Finding the 64-bit image
This was harder than it should be. Both Imager and the main download button give you 32-bit.
The 64-bit image is on the OctoPi 1.1.0 release page, hosted on unofficialpi.org.
| Item | Value |
|---|---|
| File | octopi-bookworm-arm64-lite-1.1.0.zip |
| Link | unofficialpi.org/Distros/OctoPi |
| MD5 | 74cfd8e6c5b6ff9d8443aaa357201bcd |
“Lite” only means no desktop. Every OctoPi image is lite. You run it over SSH and the web UI.
Problem - Customisation greyed out
I downloaded the zip and picked “Use custom” in Imager. Imager went straight to Write and skipped Customisation. That would give me a card with no Wi-Fi, no SSH and no user.
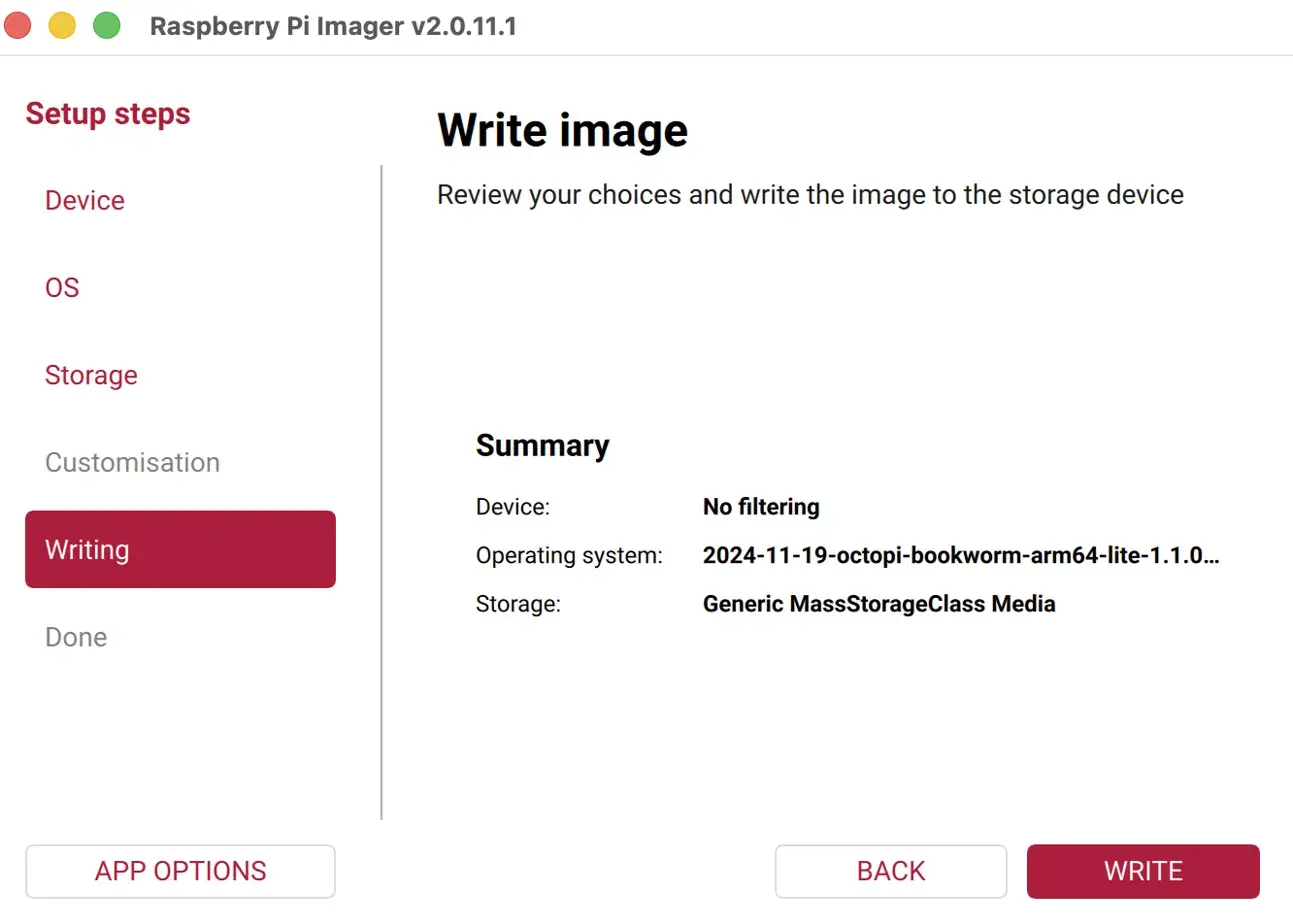
Two things caused it. I hadn’t picked a device (“No filtering”). And Imager 2.x can’t read customisation support from a plain zip file.
The fix is to add the OctoPi repository to Imager.
- Click APP OPTIONS at the bottom left.
- Under Custom image repositories add this URL.
http://unofficialpi.org/rpi-imager/rpi-imager-octopi.json- Go back and pick Raspberry Pi 4 as the device.
- Under OS pick the stable 64-bit OctoPi (1.1.0 arm64 for me).
- Customisation now works. Set the hostname
octopi, userpi, Wi-Fi and SSH with password login.
OctoPi 1.1.0 dropped the old wpa_supplicant file on the boot partition. Imager’s customisation is how Wi-Fi gets set now.
I didn’t need a fallback, but here’s one in case Customisation still won’t show up. Write the image anyway, connect the Pi to the router with an Ethernet cable and SSH in. Then run this.
sudo nmtuinmtui is the text menu for NetworkManager, which handles networking on bookworm. It opens a simple screen in the terminal. Pick Activate a connection, choose your Wi-Fi network and type the password. The Pi saves it and reconnects to that network on every boot. After that you can unplug the cable.
Before you wipe an old OctoPrint card, download a backup from Settings > Backup & Restore.
3. First boot check
Put the card in the Pi, connect the USB cable to the printer and power it on. The first boot takes 2 to 3 minutes.
If you SSH’d into an earlier install, your Mac remembers the old host key. The new system has a new key on the same IP, so SSH refuses to connect. Clear the old entries first.
ssh-keygen -R octopi.localssh-keygen -R 192.168.50.76ssh pi@octopi.localThen check the system.
hostnamewhoamicat /etc/os-release | grep PRETTY_NAMEuname -mdpkg --print-architecturefree -h | head -2df -h / | tail -1vcgencmd measure_tempvcgencmd get_throttledsystemctl is-active octoprintlsusbcat /proc/device-tree/model && echoWhat to look for.
| Check | Expected |
|---|---|
| OS | Debian GNU/Linux 12 (bookworm) |
| Architecture | aarch64 and arm64 |
| Throttle | throttled=0x0 |
| OctoPrint | active |
| USB | 2c99:001f Prusa Original Prusa COREONE |
| Model | Raspberry Pi 4 Model B Rev 1.5 |
Anything other than 0x0 for throttle means undervoltage. Fix the power before you go further. With the buck converter mine stayed at 0x0 in every check. Undervoltage often shows up only under load, so run vcgencmd get_throttled again during a print.
The fresh image came with OctoPrint 1.10.3 and I updated it to 1.11.8 from the UI. Then I checked OctoPrint to confirm that nothing broke.
4. OctoPrint setup wizard and printer profile
Open http://192.168.50.76 in the browser and go through the setup wizard. Create the admin user there. You can add more users later in Settings > Access Control, one for each person who prints.
Then set the printer profile in Settings > Printer Profiles. I started from Prusa’s official OctoPrint guide. Its printer profile step only lists values for the MK4 and XL. The CORE One values below come from my printer’s specs, a Reddit post about CORE One profile settings and a Prusa forum thread about OctoPrint on the CORE One.
| Setting | Value |
|---|---|
| Model | COREONE |
| Build volume | X 250, Y 220, Z 270 |
| Heated bed | On |
| Heated chamber | On |
| Nozzle | 0.4 mm |
| Custom bounding box | X 0 to 250, Y -9 to 220, Z 0 to 270 |
| Jog speeds (mm/min) | X 21000, Y 21000, Z 1260, E 6000 |
Two settings are easy to miss.
- Heated chamber on. The CORE One has no chamber heater, but PrusaSlicer sends
M141chamber commands. With this off, OctoPrint drops them and logs “Suppressed command M141” after every print. - Y min at -9. The Prusa start G-code draws the purge line in front of the bed at negative Y. Without the extra room, OctoPrint’s file analysis flags those moves as out of bounds. I found the -9 in this Reddit post. The Prusa forum thread uses the same value. Prusa’s guide uses -5 for the MK4 and -8 for the XL.
There’s no option to delete the _default profile. Edit it with these values and save. Your changes replace it.
5. OS hardening for the SD card
SD cards die from writes. This section cuts the writes down.
5.1 Turn off SD card swap
Swap is disk space Linux uses as extra memory when RAM runs out. OctoPi keeps a swap file on the SD card, so every swap means more writes to the card. With 4 GB of RAM the Pi rarely needs it. Turn it off.
sudo dphys-swapfile swapoffsudo systemctl disable dphys-swapfilesudo systemctl mask dphys-swapfileswapon --show # should print nothing5.2 Swap in RAM with zram
zram is a compressed swap device that lives in RAM. If the Pi ever runs low on memory, it swaps there instead of to the SD card. The commands below create a systemd service that sets up zram at every boot. Run them over SSH on the Pi.
zram-swap.service
sudo tee /etc/systemd/system/zram-swap.service > /dev/null << 'ENDZRAM'[Unit]Description=Configure zram swap deviceAfter=local-fs.target
[Service]Type=oneshotRemainAfterExit=yesExecStart=/bin/bash -c '\  modprobe zram && \  echo lz4 > /sys/block/zram0/comp_algorithm && \  echo 512M > /sys/block/zram0/disksize && \  mkswap /dev/zram0 && \  swapon -p 100 /dev/zram0'ExecStop=/bin/bash -c '\  swapoff /dev/zram0 || true && \  echo 1 > /sys/block/zram0/reset'
[Install]WantedBy=multi-user.targetENDZRAM
sudo systemctl daemon-reloadsudo systemctl enable --now zram-swap.service
To check it, run these commands.
swapon --showcat /sys/block/zram0/comp_algorithmThis is the output you should see.
NAME TYPE SIZE USED PRIO/dev/zram0 partition 512M 0B 100lzo lzo-rle [lz4] zstd5.3 fstab changes
/etc/fstab is the file that tells Linux which drives and folders to mount at boot and with which options. The Pi reads it on every boot, so a typo in it can stop the Pi from starting. That’s why you back it up first and check it before you reboot.
sudo cp /etc/fstab /etc/fstab.bakThree changes go in.
commit=60on the root filesystem. The filesystem writes its changes to the card once a minute instead of every 5 seconds. OctoPi already setsnoatime./var/logon a 50 MB tmpfs in RAM.- A journal folder on the SD card, bind-mounted over
/var/log/journal. The system log survives reboots while the rest of/var/logstays in RAM.
grep " / " /etc/fstab   # should already show defaults,noatimesudo sed -i '/ \/ /s|defaults,noatime|defaults,noatime,commit=60|' /etc/fstab
echo "tmpfs /var/log tmpfs defaults,noatime,nosuid,nodev,noexec,mode=0755,size=50M 0 0" | sudo tee -a /etc/fstab
sudo mkdir -p /var/lib/journal-persistecho "/var/lib/journal-persist /var/log/journal none bind,nofail 0 0" | sudo tee -a /etc/fstab
# Check the filesystem on every boot to catch corruption earlysudo tune2fs -c 1 /dev/mmcblk0p2
sudo findmnt --verify   # want 0 errorssudo systemctl daemon-reload
My /etc/fstab after this step.
proc /proc proc defaults 0 0PARTUUID=XXXXXXXX-01 /boot/firmware vfat defaults 0 2PARTUUID=XXXXXXXX-02 / ext4 defaults,noatime,commit=60 0 1tmpfs /var/log tmpfs defaults,noatime,nosuid,nodev,noexec,mode=0755,size=50M 0 0/var/lib/journal-persist /var/log/journal none bind,nofail 0 0nofail lets the Pi boot even if the bind mount fails. systemd mounts /var/log first and the bind second because it orders mounts by path.
I started with commit=900 (15 minutes). A power cut changed my mind. See step 14.
5.4 journald limits
journald is the system log. This config tells it to keep the log on the SD card, through the bind mount above, so it survives reboots. It also caps the log at 50 MB, leaves at least 100 MB free on the card and starts a new log file every week.
sudo mkdir -p /etc/systemd/journald.conf.dsudo tee /etc/systemd/journald.conf.d/size-limit.conf > /dev/null << 'ENDJOURNAL'[Journal]Storage=persistentSystemMaxUse=50MSystemKeepFree=100MMaxFileSec=1weekENDJOURNALsudo mkdir -p /var/log/journalsudo systemd-tmpfiles --create --prefix /var/log/journalsudo systemctl restart systemd-journald5.5 OctoPrint log rotation
A safety net for long prints that write a lot of log lines.
sudo tee /etc/logrotate.d/octoprint > /dev/null << 'ENDLOGROTATE'/home/pi/.octoprint/logs/octoprint.log {    daily    rotate 3    compress    delaycompress    missingok    notifempty    copytruncate    size 10M}ENDLOGROTATE
sudo logrotate -d /etc/logrotate.d/octoprint
The dry run should mention /home/pi/.octoprint/logs/octoprint.log. The note “size overrides previously specified daily” is fine. The log rotates once it passes 10 MB.
Check that path. With a wrong username in it, logrotate watches a file that doesn’t exist and
missingokhides it. I pasted a copy with a placeholder in the path the first time and only the dry run showed it.
5.6 Check it after a reboot
sudo reboot# reconnect, thenfindmnt /var/logfindmnt /var/log/journaljournalctl --disk-usageswapon --showThe expected output should look like this.
TARGET SOURCE FSTYPE OPTIONS/var/log tmpfs tmpfs rw,nosuid,nodev,noexec,noatime,size=51200k,mode=755TARGET SOURCE FSTYPE OPTIONS/var/log/journal /dev/mmcblk0p2[/var/lib/journal-persist] ext4 rw,noatime,commit=60Archived and active journals take up 12.5M in the file system.NAME TYPE SIZE USED PRIO/dev/zram0 partition 512M 0B 100After a second reboot, journalctl --list-boots should list two boots. That proves the journal survives a restart.
6. Turn off the default camera services
I use the Buddy3D Wi-Fi camera that came with the Prusa CORE One. OctoPi’s own camera services, like webcamd, stream cameras plugged into the Pi. With the Buddy3D they have nothing to stream. go2rtc replaces them in the next step.
for svc in webcamd camera-streamer ffmpeg_hls streamer_select; do  sudo systemctl stop "$svc"  sudo systemctl disable "$svc"done
# OctoPi installs these three as real unit files in /etc/systemd/system,# which blocks masking. Move them aside, then mask.for svc in webcamd ffmpeg_hls streamer_select; do  sudo mv /etc/systemd/system/$svc.service /etc/systemd/system/$svc.service.origdonefor svc in webcamd camera-streamer ffmpeg_hls streamer_select; do  sudo systemctl mask "$svc"donesudo systemctl daemon-reload
# Turn off OctoPi's camera autostartsudo sed -i 's/^camera_usb_options/#camera_usb_options/' /boot/firmware/octopi.txtsudo sed -i 's/^camera_http_options/#camera_http_options/' /boot/firmware/octopi.txtsudo sed -i 's/^camera_auto_start/#camera_auto_start/' /boot/firmware/octopi.txt
To check it, run these commands.
for svc in webcamd camera-streamer ffmpeg_hls streamer_select; do printf "%-20s %s / %s\n" "$svc:" "$(systemctl is-enabled $svc 2>/dev/null)" "$(systemctl is-active $svc 2>/dev/null)"donegrep -E "camera_(usb|http)_options|camera_auto_start" /boot/firmware/octopi.txtThe expected output looks like this.
webcamd: masked / inactivecamera-streamer: masked / inactiveffmpeg_hls: masked / inactivestreamer_select: masked / inactive#camera_usb_options="-r 640x480 -f 10"# -o "output_http.so -w $camera_http_webroot $camera_http_options"#camera_http_options="-n"All four services are masked and every camera line in octopi.txt starts with #. My version had no camera_auto_start line, which is fine. The “Unit does not exist, proceeding anyway” messages during masking are expected. The .orig files stay on disk, so you can undo this later.
Problem - mask failed without an error
My first attempt was a plain systemctl mask for all four, with errors sent to /dev/null. Afterwards three of them showed disabled instead of masked.
for svc in webcamd camera-streamer ffmpeg_hls streamer_select; do printf "%-20s %s\n" "$svc:" "$(systemctl is-enabled $svc 2>/dev/null)"doneThe output looked like this.
webcamd: disabledcamera-streamer: maskedffmpeg_hls: disabledstreamer_select: disabledsystemctl mask works by putting a link to /dev/null in /etc/systemd/system/. OctoPi installs webcamd, ffmpeg_hls and streamer_select as real files in that exact folder, so the link can’t be created. This shows where each unit lives.
for svc in webcamd ffmpeg_hls streamer_select; do echo "$svc -> $(systemctl show -p FragmentPath --value $svc)"doneThe output shows all three unit files sit in /etc/systemd/system/, the same folder where systemctl mask needs to create its link.
webcamd -> /etc/systemd/system/webcamd.serviceffmpeg_hls -> /etc/systemd/system/ffmpeg_hls.servicestreamer_select -> /etc/systemd/system/streamer_select.serviceThat’s why the block above moves those files first.
7. Camera pipeline with go2rtc
go2rtc is a small streaming server. It’s a single file with no dependencies. The Buddy3D camera sends an RTSP video stream in H.264. OctoPrint’s webcam view and the Telegram plugin can’t use RTSP. They need an MJPEG stream and JPEG snapshots. go2rtc reads the camera stream and serves both.
The chain looks like this.
| Hop | From | To |
|---|---|---|
| 1 | Buddy3D camera | RTSP stream, H.264 |
| 2 | go2rtc on the Pi | turns it into MJPEG at 5 fps, 127.0.0.1:1984 |
| 3 | haproxy on port 80 | serves /webcam/ to the browser |
| 4 | OctoPrint and Telegram | read snapshots from go2rtc directly |
First turn on RTSP for the camera. It’s off by default. In the Prusa app open the camera, tap the cog and switch on RTSP stream on local network. You can test it in VLC with rtsp://192.168.50.197/live. ffmpeg is already on OctoPi.
ffmpeg -version | head -1# ffmpeg version 5.1.6-0+deb12u1+rpt17.1 Install and configure go2rtc
I used go2rtc 1.9.9. Download it to your home folder and make it executable.
cd /home/picurl -L -o go2rtc https://github.com/AlexxIT/go2rtc/releases/download/v1.9.9/go2rtc_linux_arm64chmod +x go2rtc./go2rtc --version# go2rtc version 1.9.9 (fa580c5) linux/arm64Next, create go2rtc’s config file. It tells go2rtc where the camera is and what to serve. This command creates /home/pi/go2rtc.yaml. Put your camera’s IP in the rtsp:// line.
cat > /home/pi/go2rtc.yaml << 'ENDCONF'streams:  buddy:    - rtsp://192.168.50.197/live  buddy_mjpeg:    - ffmpeg:buddy#video=mjpeg#raw=-r 5
api:  listen: "127.0.0.1:1984"
rtsp:  listen: "127.0.0.1:8554"
ffmpeg:  bin: ffmpeg
log:  level: warnENDCONF
What’s in it.
buddyis the raw stream from the camera.buddy_mjpegis the same stream turned into MJPEG at 5 frames per second. OctoPrint and Telegram use this one.apion port 1984 serves the MJPEG stream and snapshots.rtspon port 8554 serves the raw stream again, which is handy for checks.
Both ports listen on localhost only. Nothing on the network can reach go2rtc directly. Everything goes through haproxy.
7.2 Services
Now create a systemd service for go2rtc. It starts go2rtc at boot and restarts it if it crashes. Run the commands below.
go2rtc.service
sudo tee /etc/systemd/system/go2rtc.service > /dev/null << 'ENDSVC'[Unit]Description=go2rtc streaming serverAfter=network-online.targetWants=network-online.target
[Service]Type=simpleUser=piGroup=piWorkingDirectory=/home/piExecStart=/home/pi/go2rtc -config /home/pi/go2rtc.yamlRestart=alwaysRestartSec=5Nice=5
NoNewPrivileges=trueProtectSystem=strictProtectHome=read-onlyReadWritePaths=/home/piPrivateTmp=true
[Install]WantedBy=multi-user.targetENDSVC
sudo systemctl daemon-reloadsudo systemctl enable --now go2rtc.service
Then create a second service, the keepalive. It holds the MJPEG stream open. Without it, go2rtc needs about 5 seconds to start the stream on the first request. Telegram snapshots would be slow and gifs would lose their first seconds.
go2rtc-keepalive.service
sudo tee /etc/systemd/system/go2rtc-keepalive.service > /dev/null << 'ENDSVC2'[Unit]Description=go2rtc keepalive (holds MJPEG stream open)After=go2rtc.serviceRequires=go2rtc.service
[Service]Type=simpleUser=piGroup=piExecStart=/bin/bash -c 'while true; do curl -s --max-time 86400 http://127.0.0.1:1984/api/stream.mjpeg?src=buddy_mjpeg > /dev/null 2>&1; sleep 2; done'Restart=alwaysRestartSec=5Nice=15
[Install]WantedBy=multi-user.targetENDSVC2
sudo systemctl daemon-reloadsleep 3sudo systemctl enable --now go2rtc-keepalive.service
Wait about 10 seconds, then test the snapshots.
systemctl is-active go2rtc go2rtc-keepalivefor i in 1 2 3; do curl -s -o /dev/null -w "grab $i: %{http_code}, %{size_download}B, %{time_total}s\n" \ "http://127.0.0.1:1984/api/frame.jpeg?src=buddy_mjpeg"doneThis is what the expected output should look like.
activeactivegrab 1: 200, 49544B, 0.229723sgrab 2: 200, 49891B, 0.185879sgrab 3: 200, 50140B, 0.149071sProblem - 720p, not 1080p
I expected 1080p. The snapshots were only 50 KB, so I checked the resolution with two commands on the Pi. file reads the size of a saved snapshot. ffprobe comes with ffmpeg, so it’s already on OctoPi. It reads the raw stream from go2rtc’s local RTSP port.
curl -s -o /tmp/frame.jpg "http://127.0.0.1:1984/api/frame.jpeg?src=buddy_mjpeg"file /tmp/frame.jpg# JPEG image data, baseline, precision 8, 1280x720, components 3
ffprobe -v error -rtsp_transport tcp -select_streams v:0 \  -show_entries stream=width,height,codec_name -of csv=p=0 \  rtsp://127.0.0.1:8554/buddy# h264,1280,720
My camera sends 720p over RTSP. go2rtc passes it through unchanged. That’s fine for monitoring and it uses less CPU.
If you run the ffprobe command above without -rtsp_transport tcp you’ll see 461 Unsupported transport. ffprobe tries UDP first. go2rtc only serves TCP, so ffprobe falls back to TCP by itself. Harmless.
7.3 Point haproxy at go2rtc
OctoPi runs haproxy on port 80. It sends browser requests for /webcam/ to a webcam backend, which still points at port 8080 where webcamd used to be. Point it at go2rtc.
sudo cp /etc/haproxy/haproxy.cfg /etc/haproxy/haproxy.cfg.baksudo sed -i 's|server webcam1 .*|server webcam1 127.0.0.1:1984|' /etc/haproxy/haproxy.cfggrep "webcam1" /etc/haproxy/haproxy.cfg # server webcam1 127.0.0.1:1984sudo haproxy -c -f /etc/haproxy/haproxy.cfg # "Configuration file is valid"sudo systemctl restart haproxyTest the path through haproxy.
curl -s -o /dev/null -w "%{http_code}, %{size_download}B, %{time_total}s\n" \ "http://127.0.0.1/webcam/api/frame.jpeg?src=buddy_mjpeg"# 200, 49260B, 0.142903sProblem - haproxy returned 503
I ran that test before I changed haproxy and got this.
503, 4411B, 3.006056sA 503 after 3 seconds means haproxy’s webcam backend isn’t answering. This shows where it points.
grep -n -A4 "backend webcam" /etc/haproxy/haproxy.cfg# 42:backend webcam# 43- http-request replace-path /webcam/(.*) /\1# 44- server webcam1 127.0.0.1:8080Port 8080, the old webcamd. After the change in step 7.3 the same test returned 200.
7.4 Webcam URLs in OctoPrint
In Settings > Webcam & Timelapse > Classic Webcam.
| Field | Value |
|---|---|
| Stream URL | /webcam/api/stream.mjpeg?src=buddy_mjpeg |
| Snapshot URL | http://127.0.0.1:1984/api/frame.jpeg?src=buddy_mjpeg |
| Aspect ratio | 16:9 |
The stream URL is relative because your browser goes through haproxy. The snapshot URL is localhost because the OctoPrint server fetches it directly. The 16:9 aspect ratio matches the 720p stream, so OctoPrint doesn’t crop it. Open the Control tab and you should see the live feed.
8. Connect the printer
Older CORE One firmware has an RPi Port option in the LCD settings, which has to be off for OctoPrint. I couldn’t find it on current firmware. It’s gone, so skip this if you don’t see it either.
In OctoPrint’s Connection panel set /dev/ttyACM0, 230400 and Auto-connect on server startup, then click Connect.
230400 baud keeps the printer’s command buffer fed on fast moves. The state should change to Operational and the temperature graph should start moving.
Problem - “Save connection settings” unchecks itself
“Save connection settings” was off on my first connect. I disconnected, ticked it and connected again. Once connected, the box was unticked again. That’s normal. It’s a one-time action, not a setting. Check the config file to be sure it saved.
grep -A6 "^serial:" ~/.octoprint/config.yamlThe output should look like this.
serial: autoconnect: true baudrate: 230400 port: /dev/ttyACM0Optional - low-latency serial rule
A lot of OctoPrint setups add a udev rule that sets low_latency on the printer’s serial port. I tried it. It needs setserial, which OctoPi doesn’t ship.
sudo apt-get install -y setserial
sudo tee /etc/udev/rules.d/99-usb-serial.rules > /dev/null << 'ENDUDEV'ACTION=="add", SUBSYSTEM=="tty", ATTRS{idVendor}=="2c99", ATTRS{idProduct}=="001f", RUN+="/bin/setserial /dev/%k low_latency"ENDUDEVsudo udevadm control --reload-rules
Disconnect in OctoPrint, unplug and replug the USB cable and connect again. Then check.
setserial -a /dev/ttyACM0# Flags: spd_normalNo low_latency flag. The CORE One is a USB CDC device (ttyACM0) and its cdc_acm driver ignores that flag. I kept the rule because it does no harm. You can skip it. The things that keep the serial link fed are the 230400 baudrate and arc fitting in PrusaSlicer. After a 36-minute print, my resend ratio was 0 out of 20.9K lines.
9. Plugins and Telegram
What I installed from Settings > Plugin Manager > Get More.
| Plugin | Why |
|---|---|
| Telegram | Notifications with snapshots, pause and cancel from the phone |
| Cancel Objects | Cancel one object on a multi-part plate |
| HeaterTimeout | Turns off heaters left on without a print |
| PrintTimeGenius | Better time estimates |
| Slicer Thumbnails | Shows the PrusaSlicer preview in the file list |
| Display Layer Progress | Current layer and height |
| Navbar Temp | Pi and printer temperatures in the top bar |
| Dashboard | One-screen status |
| UI Customizer | Layout and theme |
| Cost Estimator | Filament cost per print |
| Google Drive Backup Schedule | Off-card backups (disabled for now) |
The Telegram plugin uses cpulimit to keep gif encoding from eating the CPU.
sudo apt install cpulimitCreate a bot with @BotFather, paste the token into the plugin settings and send your bot a message to register your chat. The plugin only makes outgoing connections, so no router changes.
Telegram doesn’t pause a failed print by itself. It shows you the print, then you decide what to do. A failure at 3 AM keeps printing until you look.
Problem - scary errors in the log after a restart
grep -iE "error|exception" ~/.octoprint/logs/octoprint.log | tail -20I got Failed to resolve 'pypi.org' and a long list of Error Tracking (bundled) lines. The second one is just a bundled plugin whose name has the word “error” in it. The first one is OctoPrint checking for updates before Wi-Fi has DNS at boot. Confirm DNS works now and move on.
getent hosts pypi.orgcurl -sI https://api.telegram.org | head -1 # any HTTP status line is fineThe expected output looks like this. Your addresses will differ.
2a04:4e42:400::223 pypi.org2a04:4e42::223 pypi.org2a04:4e42:200::223 pypi.org2a04:4e42:600::223 pypi.orgHTTP/2 30210. G-code scripts for pause, resume and cancel
This part mattered most to me, because I pause and cancel from Telegram. I checked every command against Prusa’s own OctoPrint guide for MK4, XL and CORE.
My Settings > GCODE Scripts.
| Script | G-code |
|---|---|
| After print job is paused | M601 |
| Before print job is resumed | M602 |
| After print job is cancelled | M604 then M141 S0 |
| After print job completes | Bed drop, see below |
| Everything else | Empty |
M601 and M602 are the firmware’s own pause and resume. The printer parks the nozzle and handles temperatures by itself.
{% if last_position.z is not none and last_position.z < 135 %}G1 Z135 F720{% endif %}This lowers the bed to the middle after short prints, so you can reach the part. For prints taller than 135 mm it does nothing.
M141 S0 clears the chamber target temperature. PrusaSlicer’s start G-code sets it (20°C for PLA) and the end G-code clears it. A cancel skips the end G-code, so the target stays set. I added it after I saw the chamber target still at 20°C on the graph after a cancel.
Why M604 and not M603
Many OctoPrint setups online use M603 for cancel. That was the cancel command on the old MK3. Prusa’s guide explains that Marlin later added its own M603 with a different function, so on the newer printers the cancel command is M604. On Buddy firmware M603 is Marlin’s “configure filament change”. I used M604 from the start, so I never tried M603 on the CORE One. The cancel test in step 12 shows M604 does the job.
Pausing from the slicer
In Settings > Serial Connection > Firmware & Protocol, keep Log position on pause and Log position on cancel on. Leave the rest at the defaults.
My first idea was to add M601 to Pausing commands, so a pause added in PrusaSlicer would pause OctoPrint too. But OctoPrint would then also send that M601 to the printer. The pause script sends another one. Two pause commands in a row could re-pause the printer right after resume.
Look at how OctoPrint treats M0. It’s in both Blocked commands and Pausing commands. So OctoPrint pauses on it, never sends it to the printer and runs the pause script once. That’s what I want. So I left OctoPrint alone and changed the pause G-code in PrusaSlicer from M601 to M0 (next step).
11. PrusaSlicer
I duplicated the CORE One printer profile and made an OctoPrint copy.
| Where | Setting | Value |
|---|---|---|
| Printer Settings > General | Supports binary G-code | Off |
| Printer Settings > General | G-code thumbnails | 16x16/QOI, 313x173/QOI, 480x240/QOI, 380x285/PNG, 32x32/PNG, 400x300/PNG |
| Printer Settings > Custom G-code | Pause Print G-code | M0 |
| Print Settings > Output options | Label objects | OctoPrint comments |
| Print Settings > Advanced | Arc fitting | Enabled (already the Prusa default) |
OctoPrint can’t read binary G-code. The extra PNG thumbnails are for the Slicer Thumbnails plugin and Telegram. Label objects is what Cancel Objects needs. Print settings are per profile, so I saved them into both print profiles I use (Balanced and Structural).
When you open someone else’s 3MF, use Load model only. Otherwise its embedded profile replaces your OctoPrint settings.
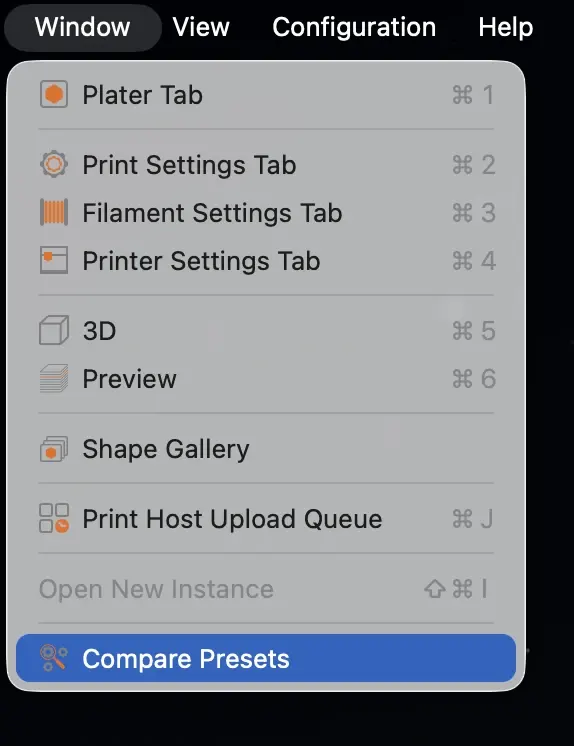
If you already loaded a 3MF with its settings, open Window > Compare Presets. Pick the preset the 3MF brought in and your OctoPrint preset. It lists every setting that differs, so you can see what the model needs and copy it into your OctoPrint preset.
Physical printer
- In OctoPrint, Settings > Application Keys, type “PrusaSlicer” and generate a key.
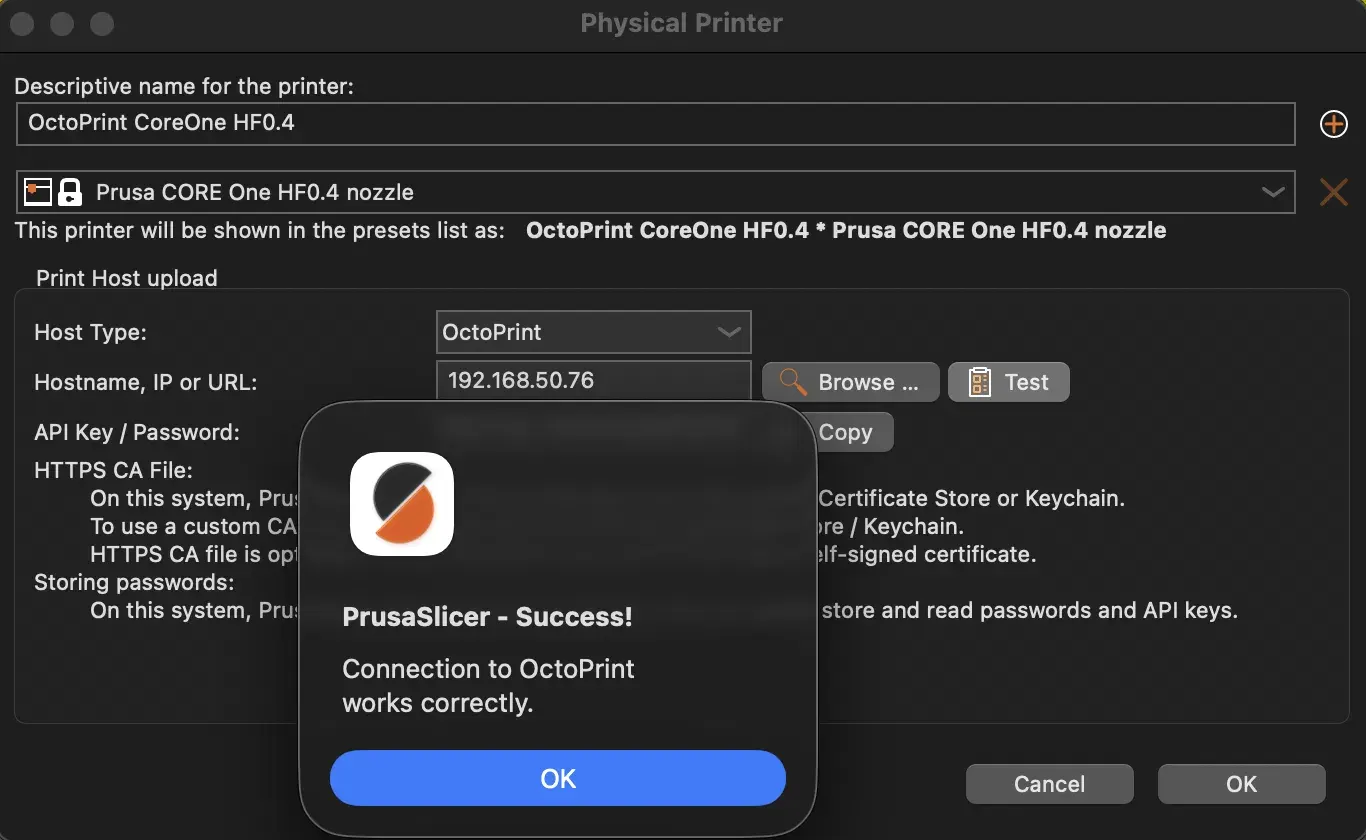
- In PrusaSlicer, click the cog next to the printer list and add a physical printer.
- Host type OctoPrint, hostname
192.168.50.76, paste the key, click Test.
⚠️ Keep the API key and the application key in a password manager or a private note. Either one gives full control of the printer.
Problem - PrusaSlicer 2.9.6 crashed on OK
The test passed. I clicked OK and PrusaSlicer crashed (EXC_BAD_ACCESS on macOS). The crash report shows it died while redrawing the Printer Settings tab inside the physical printer dialog’s OK handler. That’s a PrusaSlicer bug. The physical printer was saved before the crash.
If it’s missing after a restart, add it again while the Plater tab is open (the main 3D view, Window > Plater Tab or ⌘1). Not the Printer Settings tab, which is where the crash happened.
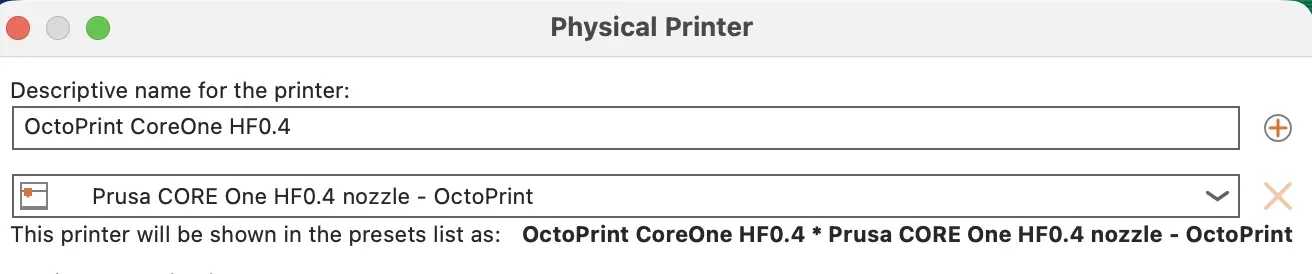
The screenshot shows a second issue. The physical printer was linked to Prusa’s locked system profile “Prusa CORE One HF0.4 nozzle”. That one still has binary G-code on and M601 as the pause code. Edit the physical printer and link it to your own OctoPrint profile. Mine now points at “Prusa CORE One HF0.4 nozzle - OctoPrint”, my copy with the ” - OctoPrint” suffix.
12. Test print
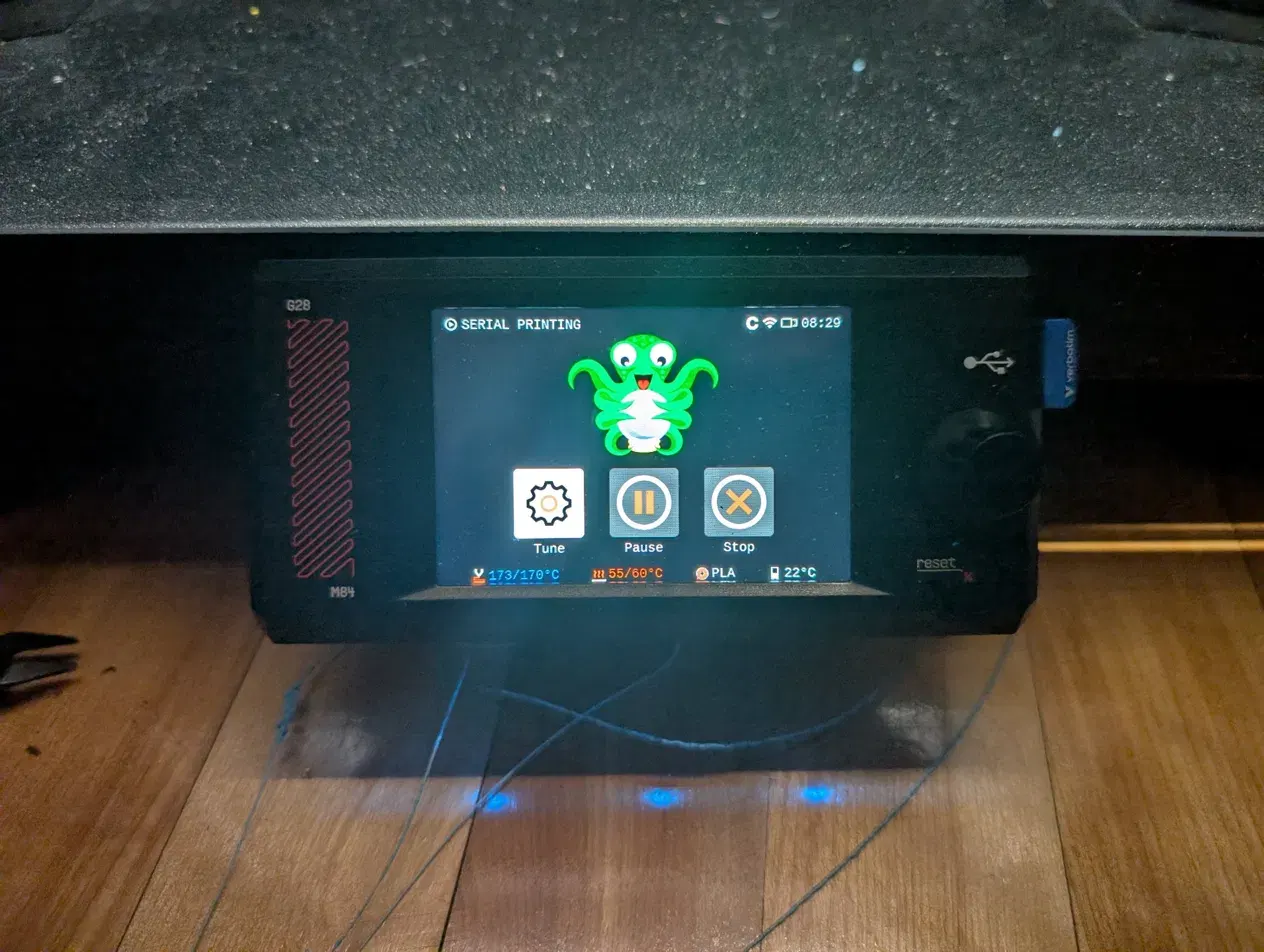
Halloween is coming, so my test print was an absolutely terrifying ghost. It takes 36 minutes. I sliced it and sent it to OctoPrint. The LCD switched to the SERIAL PRINTING screen with the OctoPrint octopus. That means the printer knows the job comes over USB.
Telegram sent the startup message, the slicer thumbnail, a live snapshot and the print events.
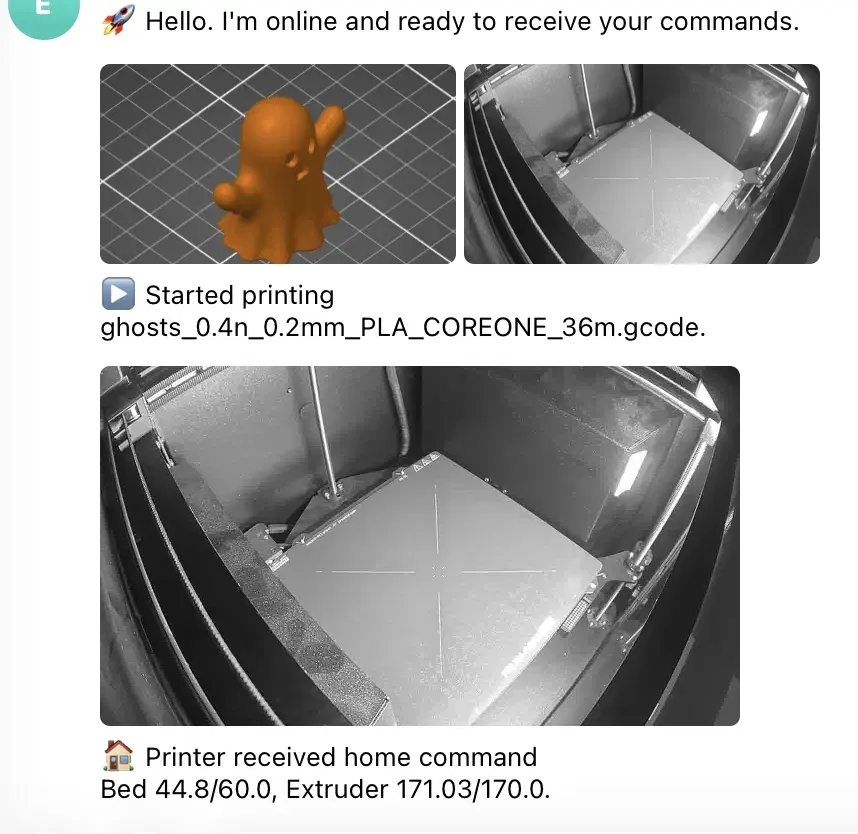
The camera picture is black and white. It looks like the Buddy3D’s infrared night mode, even though the chamber lights were on.
Pause and resume
I paused from OctoPrint. The bed dropped first, then the toolhead moved clear of the part. The LCD button changed from Pause to Resume, so the firmware registered the pause from M601. Resume brought the head back and the print continued.
Telegram snapshots are taken the moment the event fires. So the “paused” photo still shows the nozzle on the part and the “resumed” photo shows no toolhead at all. It’s timing, not a problem.
The seam was fine. There was one small blob from ooze. The nozzle stays at 220°C while parked, so a bit of PLA drips out. Wipe the nozzle with tweezers before you click Resume. I didn’t add a purge script, because the firmware handles the return move inside M602 and I don’t want to fight it.
Cancel
I cancelled from OctoPrint. Printing stopped, the heaters went off and the bed dropped. The toolhead stayed where it was. That’s safe, since the bed moved away and the heaters are off. I didn’t add a park move after M604, because the firmware may not accept normal moves right after an abort.
The temperature graph is the proof that M604 works. Right at the red Cancel line, both targets drop to off. The cancel script only sends M604, so it was the printer’s own abort routine that turned the heaters off.
Telegram says “Printing failed” for a cancel. OctoPrint reports a cancelled job as failed and the plugin repeats it. You can change the text in the plugin’s notification settings.
Problem - M141 S0 in the wrong box
When I added M141 S0, I put it in “After print job is paused” by mistake.
In the pause script it clears the chamber target on every pause. Resume doesn’t bring it back. The rest of the print runs without the chamber setting from the filament profile. It belongs in the cancel script only.
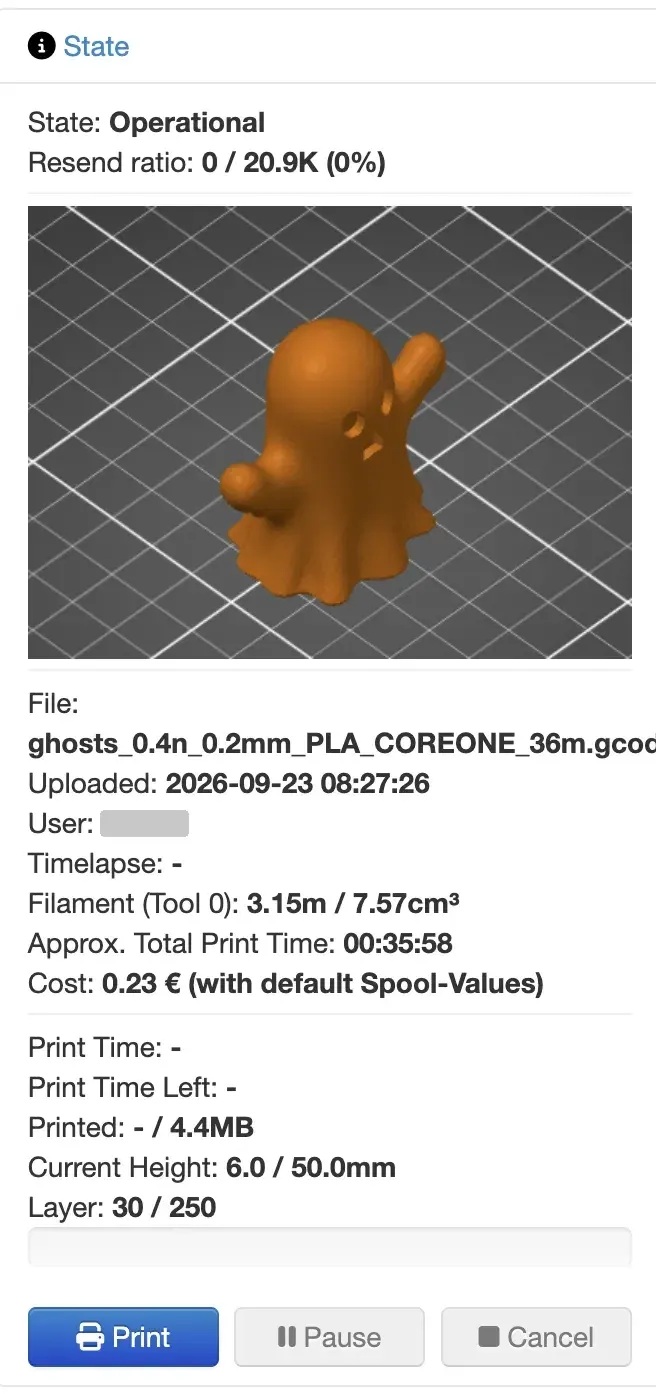
The State panel after the test print. Thumbnail, layer progress and cost all work. The cost is on default values until you enter your spool price and weight in Cost Estimator.
13. Updates and validation
I left apt updates until everything worked, so an upgrade wouldn’t get mixed up with setup problems.
sudo apt-get update && sudo apt-get upgrade -yIt stopped on a prompt about /etc/initramfs-tools/initramfs.conf. The OctoPi build changed that file. Press N to keep your version. It’s the one your Pi already boots with.
apt-get upgrade kept back 11 packages, among them the kernel, firmware and rpi-eeprom. They need new dependencies, which upgrade never installs. full-upgrade does.
sudo apt full-upgrade -ysudo rebootuname -r # 6.12.109+rpt-rpi-v8sudo apt autoremove -ysudo rpi-eeprom-updateThe bootloader had an update. I answered y. It stages the update and writes it during the next reboot. Don’t unplug the Pi during that reboot.
After every reboot I run this validation block. Replace YOUR_API_KEY with the key from OctoPrint Settings > API.
Full validation block
echo "=== FULL SYSTEM VALIDATION ==="
echo "=== SERVICES ==="for svc in octoprint go2rtc go2rtc-keepalive zram-swap haproxy; do  printf "%-22s %s\n" "$svc:" "$(systemctl is-active $svc)"done
echo -e "\n=== DISABLED SERVICES ==="for svc in webcamd camera-streamer ffmpeg_hls streamer_select dphys-swapfile; do  printf "%-22s %s\n" "$svc:" "$(systemctl is-enabled $svc 2>/dev/null || echo 'masked/not-found')"done
echo -e "\n=== PRINTER ==="API_KEY="YOUR_API_KEY"curl -s "http://127.0.0.1:5000/api/connection" \  -H "X-Api-Key: $API_KEY" | python3 -c "import sys,json; d=json.load(sys.stdin)['current']print(f'State: {d[\"state\"]}, Baud: {d[\"baudrate\"]}')"
echo -e "\n=== SNAPSHOTS ==="for i in 1 2 3; do  curl -s -o /dev/null -w "grab $i: %{http_code}, %{time_total}s\n" \    "http://127.0.0.1:1984/api/frame.jpeg?src=buddy_mjpeg"done
echo -e "\n=== SYSTEM ==="vcgencmd measure_tempvcgencmd get_throttledfree -h | grep -E "Mem|Swap"df -h / | tail -1
echo -e "\n=== FAN ==="echo "Trip point: $(cat /sys/class/thermal/thermal_zone0/trip_point_0_temp 2>/dev/null || echo 'not configured')"echo "Fan state: $(cat /sys/class/thermal/cooling_device0/cur_state 2>/dev/null || echo 'not configured')"
echo "=== DONE ==="
My final output.
=== SERVICES ===octoprint:             activego2rtc:                activego2rtc-keepalive:      activezram-swap:             activehaproxy:               active
=== PRINTER ===State: Operational, Baud: 230400
=== SNAPSHOTS ===grab 1: 200, 0.197930sgrab 2: 200, 0.191929sgrab 3: 200, 0.154554s
=== SYSTEM ===temp=38.4'Cthrottled=0x0Mem: 3.7Gi 362Mi 3.0Gi 5.9Mi 347Mi 3.3GiSwap: 511Mi 0B 511Mi/dev/mmcblk0p2 59G 3.8G 52G 7% /
=== FAN ===Trip point: 110000Fan state: not configured
The disabled services print masked and then masked/not-found. That’s a bash quirk. For a masked service systemctl is-enabled prints its state and exits non-zero, so the || echo fires too.
“Trip point 110000” is the Pi’s built-in 110°C limit. No fan control is set up on the Pi itself. I’m not sure whether the Armor case fans support PWM speed control or always run at the same speed. At 38°C there’s plenty of room.
14. The power cut
The next morning I had a print running when the power in the house went off for a second. The printer and the Pi both rebooted. When they came back, there was nothing to resume.
That’s how OctoPrint works. Prusa’s OctoPrint guide lists Power Panic among the features that don’t work when you print through OctoPrint.
| Printing from | Survives a power cut |
|---|---|
| USB stick or Prusa Connect | Yes, Power Panic resumes it |
| OctoPrint over USB | No, the job is gone |
With Power Panic the printer holds the whole file and saves its position. With OctoPrint, the printer only has the next few lines. The file is on the Pi. The Pi lost power at the same moment. Resuming by hand is risky on a CORE One. It homes Z by probing the bed with the nozzle, so it would drive into the part.
Problem - that morning’s logs were gone
I checked the SD card after the outage.
journalctl --list-bootssudo dmesg | grep -iE "ext4|mmc" | grep -iE "error|fail"No card errors. But the journal from that morning was almost empty. journald renamed the file it couldn’t close to .journal~.
sudo journalctl --header --file '/var/lib/journal-persist/*/system@*.journal~' \ | grep -iE "state|entry objects|tail realtime"State: ONLINETail realtime timestamp: Tue 2026-09-22 21:58:00 EDTEntry objects: 179Only 179 entries reached the card, all from the first minutes after boot. The date looks wrong because the Pi has no battery-backed clock. After a night switched off, it starts with the last time it saved and corrects it once it’s online. Everything after those first minutes, including the whole print, was lost.
At that point I had commit=900, which lets the filesystem keep changes in memory for up to 15 minutes. That explains part of it. I’m not sure it explains all of it. I lowered it to one minute, which still writes 12 times less often than the Linux default of 5 seconds. That’s why step 5.3 uses commit=60.
sudo sed -i 's/commit=900/commit=60/' /etc/fstabsudo findmnt --verifysudo systemctl daemon-reloadsudo rebootfindmnt / -o OPTIONS # rw,noatime,commit=60I do have a UPS. Normally the printer and the Pi run on it. During setup and calibration the printer was in another room, away from the UPS. On the UPS, short outages like this one don’t stop the print and the card never loses power mid-write.
15. What I’d tell you before you start
- Flash 64-bit from the start. Add the unofficialpi.org repository in Imager before you do anything else.
- Check your paths. Every service file and script uses the username. A wrong one fails quietly.
- Check, don’t trust. Some commands hide their errors, like
systemctl maskwith2>/dev/nullor logrotate withmissingok. Run a check after each step. - Use
M604for cancel on a CORE One, MK4 or XL. NotM603. - Use
M0as the slicer pause in your OctoPrint printer profile. OctoPrint blocks it and runs your pause script once. - Keep the printer and the Pi on a UPS. Power Panic doesn’t work through OctoPrint, so a power cut ends the print.
- Back up after every change. OctoPrint’s Settings > Backup & Restore takes a minute. Keep the zip off the SD card.
Monthly maintenance is short.
sudo apt-get update && sudo apt full-upgrade -ysudo reboot# then run the validation block againUpdate OctoPrint and plugins from its own notifications, between prints.
Links
- OctoPi 1.1.0 release with 32-bit and 64-bit images
- Raspberry Pi Imager
- Prusa OctoPrint setup for MK4, XL and CORE
- go2rtc
- OctoPrint Telegram plugin and its wiki
- OctoPrint